Tag Archives: home improvement

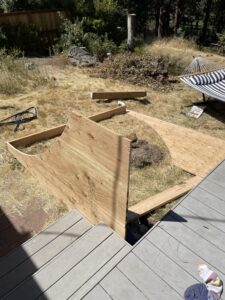
Mini ramp update 7: skeleton!

All sorts of shit is subtly wrong or suboptimal but the brush strokes are all in place.

Working on the flat bottom next, I’m comically short of 2×6’s for it and will need to do a run to the lumber supply corp to resolve that. Minor shimming awaits, and then I can do another round of weatherproofing, followed by a few sheets of 3/8″ plywood, more weatherproofing, and then finally the Gatorskins!

This weekend is adult skate camp though, so I’ll be busy doing that from Friday through Sunday. No more updates for a few days…

Mini ramp update 6: downhill footings complete!

It is nine thirty on Sunday evening, I have run 3.5 miles, towed some fifty pounds of Eldest Child up maybe 2 miles of the Whoops Climb to initiate him into CULT MTB with his first trail decent, and the lower footings are in for the mini ramp!

Evening truly is a fine time for this kind of digging holes and filling them again kind of work. The sun is down, and one can actually see the laser level’s line. I love Bend mightily, but the sun does makes it hard to see the laser line at 24 feet away. A splash of DEET after 9 pm, and you’re off to the races!

Mini ramp update 5: footings for the downhill side

The hill in my backyard is on a serious grade, so I’ve had to get creative about bringing the downhill side up to level with the uphill side.

I’ve elected to tamp gravel into holes (to provide a foundation minimizing movement over time, and draining well, not that we get huge amounts of rain in Bend, but old habits die hard…), and then set prefab cinderblocks with galvanized 4×4 holders. Then, I’m using 4×4 pressure treat to bring the whole bottom side up to level with the uphill side. To do this, I measured from the top of a 4×4 sitting in one of the cinderblocks to the bottom of the cinderblock, and added that to the height I read off pavers Veen and I installed and leveled a few days back. This gave me a datum of 49 7/8″ that I needed all of the cinderblocks to rest on.

Using a laser level, it was pretty darn easy to get them all to the same height. And, the beams are even looking pretty darn level! Level enough to get shimmed the rest of the way into place, at least!

Continue reading Mini ramp update 5: footings for the downhill side

Mini ramp update 4: Gatorskins!

The Gatorskins have arrived!

I was at first baffled about how to get this palletized pile of impregnated sheet goods out of the back of my pickup, but Veen came to my aid and together we determined that the bottom pallet FedEx used to get the big pallet into my bed would do just dandy as an unloading ramp.

We were considering jerry-rigged hoist operations and other things I didn’t want to subject the carport to, so I’m very glad we came to this solution.

Mini ramp update 2

Can’t say as I have any idea how I got out of Home Depot without pictures of the first haul of supplies for the skate ramp. Plenty of 2×6’s, and 3/4 inch plywood for the transition panels.

Apparently I failed to document the transition panel fabrication process as well, but I definitely ran the jigsaw way too hot, way too fast, and ended up with terrible cuts that I then needed to bring into symmetry.

Harmonization entailed buying a belt sander (oh no, more tools!), and screwing the transition panels together to ensure that each side of the pipe was sculpted identically. I started out attempting to do all 4 at the same time, but that really chewed through belts, and I was struggling to get good contact across all four at the same time anyways, so I went down to two pairs.

Long story short, I’ve assembled the skeleton of one of the transitions for the ramp, started laying out where I want the footings/foundation to all sit, and will be working on leveling everything up as we go.

Continue reading Mini ramp update 2

Make water wet again! The (personal) case for non-aerating faucets

Have you ever noticed that when you pull a mouthful of water directly from the bathroom faucet, you have to let the bubbles collect and exhaust them from your mouth before you can get a good rinse? Conservationists have added air to your water (making it less wet per unit volume, the sacrilege) in order to reduce your water usage and hide the fact. My wife and I are both a bit sensitive to white noise, so I’ve crusaded around the house replacing all of the obviously noisy faucet attachments most annoyingly loud. In addition to making life just generally quieter, having streams of water that are more densely wet helps get hands and teeth and dishes and everything else cleaner faster than if the water is constantly interrupted from wiping the surface with eco-friendly bubbles of air.

Before:

After:

Continue reading Make water wet again! The (personal) case for non-aerating faucets